Tuesday, December 23, 2008

Dark Chocolate Peanut Butter Cake

My Melvin said this cake on a scale of 1-10 is a 20!!! My camera is out of batteries right now so I can't post a picture... that is if there is any left. But I just wanted to share this recipe with anyone who loves peanut butter. Mel usually slathers peanut butter on most sweet things. Banana bread, cookies, etc.... so this recipe worked out great!

I do cheat. Yes you caught me! I used a box cake mix for this recipe. Any dark chocolate is fine... devils food cake mix, chocolate butter cake mix, etc. How can you even go wrong with peanut butter and chocolate? You can even make cupcakes and then frost each one. Maybe top with a few reeses pieces or one reeses peanut butter cup. Yum.

Ok, so obviously you need to make your cake. Let cool completely. This time I used a bundt pan, but I also thought about doing to 9" rounds and putting a layer of frosting in the middle. Very tempting. Once the cake is done and completely cooled, frost!

Peanut Butter Frosting

3/4 cup peanut butter (creamy if you want smooth, crunchy if you want crunch)
1/2 cup margerine (1 stick, softened)
1 1/3 cup powdered sugar
1-3 tablespoons milk (ONLY if it's too thick for your liking)

  • In a large bowl, add softened margerine and peanut butter. Beat with electric mixer until creamy and smooth.
  • Add powdered sugar and beat about 3 minutes, until light and fluffy.
  • If it's a little thick for your liking, add 1-3 tablespoons milk. I used about 1 tablespoon. Beat until desired consistancy is reached.
  • Frost cake, enjoy a slice, then go to the gym :)

Thursday, December 11, 2008

No recipe, just blogging nonsense!

So Christmas is just around the corner, why am I feeling like the Grinch?

I we put up some Christmas lights and a mini Christmas tree but what is a holiday without a bunch of little ones running around? I know the way I used to light up and be just estatic for Christmas when I was little....I'd like to experience that again with my own kids.

I've been doing some baking.... cookies, pies, cheesecakes, cakes, etc which Melvin loves. As of Decemember he is temporarily out of work until February. This will be a bit of a hard period but we do have things figured out and our stability is not at stake. The bright side is he will be home a lot more and we will have tons of time to spend together. Of course I will still be working but that is quite necessary so I can get out of the house and not go crazy :)

It sure is hard to get in the Christmas spirit while living in Southern California. In Decemember it's been in the 80's and it's very annoying. Obviously no snow and only a day of rain so far to speak of. I miss Seattle and would love to spend a Christmas in a snowy place, maybe next year.

Sunday, November 30, 2008

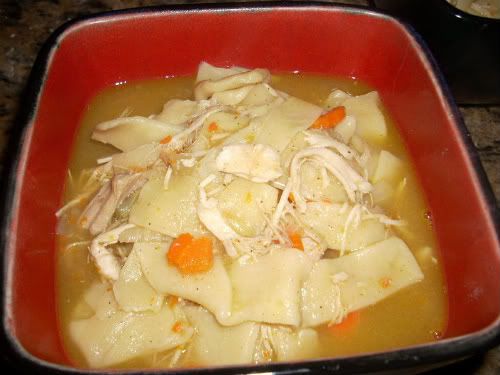
Turkey Noodle Soup - OMG it's heavenly!

So since we knew we were spending Thanksgiving at Mel's Mom's house, I wanted to make a turkey a few days before Thanksgiving so we could have our own bird!! **You can do any and all of these recipes with chicken as well** After I finished stripping all the meat off of my turkey, I put all the bones in my crockpot. I added about 8 cups of water, 2 bay leaves, and some salt and put my crockpot on low overnight for 8 hours. In the morning I took all the big bones out, strained, it and then I had amazing Turkey Broth for my soup the next day! I stored it in a tupperware in the fridge.


The first night we had an amazing Turkey dinner... turkey slices, mashed garlic potatoes, and I made a delicious gravy from the turkey drippings. It was easy and came out so full of flavor:


Turkey gravy: In a small saucepan melt 1/4 cup butter or margarine. Add in 1/4 cup flour and stir constantly for about 2 minutes until smooth. Add black pepper, the more the better. Add 2 cups turkey drippings (so obviously you make your gravy when the turkey is done, while it's resting) and stir constantly for a few minutes, it will continue to get thicker and thicker. Taste test and add more black pepper if needed. SOOOOOO GOOOD.


So anyways, the next night we had some delicious turkey sandwiches. It was nice to have such an easy dinner after a night of lots of cooking and dishes with the turkey!! The night after that I was so excited to make my Turkey Noodle Soup. The best part? Homemade NOODLES!! Yum. You will never want storebought noodles again after you try this. Here goes -


Homemade Noodles

2 1/2 cups flour

1/3 cup water

2 eggs

1 teaspoon salt

2 tablespoons oil


  • In a large bowl mix flour and salt. Create a hole in the middle, and add beaten eggs, oil, and water. Mix well with the flour mix.

  • Form dough into a big ball and on a well floured surface, knead dough for about 8 minutes until smooth. Cover and let rest 10 minutes.

  • Divide dough into 4 parts. Using a rolling pin, flatten each part (on a floured surface) until pretty thin, but not too thin. Let sit out on the counter 2-3 hours.

  • When soup is pretty much done, start cutting up your flat pieces of dough into small strips. You can make them as fat/skinny, long/short and any shape you want. They will stay the same shape even when cooked in the soup.

Ok while your dough is sitting out for a couple of hours, you can start your soup!


Turkey Noodle Soup (or chicken!)


2 tablespoons oil


1/2 onion, diced


2 carrots, peeled and sliced into little carrott rounds


2 celery stalks


4 garlic cloves, minced


6-8 cups turkey broth (or chicken) depending on how soupy you like your soup. You can add 6 to start off with, and add more later near end of cooking time if you like


2 bay leaves


1/2 tablespoon thyme


1/2 tablespoon sage


3-4 cups cooked, shredded turkey


Salt and pepper to taste. The more pepper, the better.


  • Ok so using a large dutch oven or big soup pot, heat the oil. Chop up your carrots, onion, garlic, and celery. Put in hot oil and stir fry for about 5 minutes until semi tender.

  • Add desired amount of turkey broth, and turn up heat to bring to a low boil

  • Add spices and shredded turkey

  • Turn down heat to a low simmer and simmer uncovered about 1 hour to let flavors blend.

  • Add noodles during last 5 minutes of cooking time. Serve with crusty bread.

  • Enjoy !

Photobucket


Tuesday, October 21, 2008

"Olive Garden's" Sausage Potato Soup

Melvin is not a big soup lover but this warmed us up tonight. It's very cheap to make and I had mine ready in just over half hour. Perfect for weeknight cooking. This is about enough for 3 or so people, so just double it if you're feeding more or want leftovers. To me it tastes like the soup they serve at Olive Garden!

Sausage Potato Soup

1lb sausage (breakfast or italian)
1 small onion, diced
14 oz. can chicken broth
1 teaspoon garlic salt
1/2 teaspoon pepper
1/2 teaspoon dried basil
1 large potato, diced in small bite size pieces (leave skin on)
8oz evaporated milk
1-2 handfulls shredded cheddar cheese

In a large sauce pan or dutch oven brown sausage and onion. Drain and add back to pain.

Add chicken broth and spices, and bring to a boil.

Add potatoes, and simmer medium heat for about 20 minutes or until potatoes are very soft and some skins fall off.

Take off heat, stir in milk and cheese. Serve.

SO FREAKIN EASY!

Saturday, October 18, 2008

Sweet and Spicy Pumpkin Seeds


It's Halloween time again!! I was in full force pumpkin mode today. I made these amazing seeds (thought up the recipe as I went along), carved 2 pumpkins, and also made a pumpkin cheesecake. I was really happy with my "old man with a mustache" pumpkin then I made the mistake of going fast with the little carving knife and I cut the swirl off one side of his mustache. I was so sad... there was no going back!!


Shhhh heeheee, I'm eating the seeds as I blog! Oh, also this recipe is for the pumpkin seeds of two regular sized carving pumpkins. I know each pumpkin is different, but just go by what you think is the right taste for your family. And from what I've learned, bigger pumpkins don't have more seeds, they just have bigger seeds!


Sweet and Spicy Pumpkin Seeds


Once you have all the seeds out of your pumpkin, place in a large bowl. Fill bowl with warm water. All the pumpkin guts and stringy stuff will sink to the bottom, and all the seeds will float to the top. Take out seeds with hands or a slotted spoon place into another clean bowl. If there is a little bit of the guts still on the seeds, it's ok.


Boil a pot of water. You want about 2 cups of water for each 1/2 cup of seeds. Once boiling, add about 1/8th cup of salt. Add seeds and boil for 10 minutes, stirring constantly. Watch, or they will boil over. Very important to keep stirring. Preheat oven to 350.


Once 10 minutes is up, pour seeds and water into a colander and shake all excess water off. Put your clean, boiled seeds back into the bowl without the pumpkin gunk. Add the following to the bowl, and mix well with a large spoon:


2 tablespoons olive oil
1 tablespoon worcestershire sauce (mix, then add spices)

1 tablespoon cajun seasoning

few dashes cayenne pepper

1 teaspoon seasoning salt

1 teaspoon pumpkin pie seasonings


Mix well. Coat a large cookie sheet with foil. Spread pumpkins out as much as possible. Bake in 350 oven for 20 minutes. Stir. Bake another 20 minutes. Stir. Bake another 10 minutes and eat one. If they are done, great! If not, bake another 10 minutes. Seeds should be perfectly crunchy (you eat the shell and all) at about 50-60 minutes total baking time.


Store in an air tight container or zip lock bag. Yum!


Homemade Thin Crust Pizza


I used to buy the Boboli pizza crusts but the economy is bad right now and they are expensive! Might as well order a pizza for the cost of those! So I use this homemade, super simple and easy thin crust pizza and we really enjoy it. We love sausage but you can do whatever pizza toppings you like... sky is the limit!


Thin Crust Homemade Pizza


In a bowl mix the following:


1 cup flour

1 egg

2/3 cup milk

1/2 teaspoon salt

1 teaspoon dried basil


Mix well with a spoon. Preheat oven to 400 degrees. Use parchment paper for easy clean up. Put paper (this is not a must) on a large cookie sheet. Spoon the dough out evenly all over the cookie sheet. It looks like it will stick bad to the pan, but once it cooks, it won't! I usually use a spatula to spread it all evenly.


Do not put any toppings on yet. Bake for 20 minutes by itself.


While the dough bakes, open a can of tomato sauce and put it into a small sauce pan. Add italian spices to taste. I use a combo (without measuring) of basil, thyme, oregano, herbes de provence, salt, pepper, and red pepper flakes. Let simmer while the dough bakes. If you don't to do this step, just buy pre made pizza sauce.


Once the dough is done (just the edges should be getting brown) take out of the oven. Spread the sauce all over. Top with your favorites. In the picture, I have diced onions, sliced olives, cooked italian sausage, and colby jack shredded cheese. Put your toppings on, top with shredded cheese, and put back in the 400 degree oven for 10 minutes.


Your cheese should be nice and melted, and your pizza should be thin and crispy. Enjoy!

Tuesday, October 14, 2008

Succulent Melt in Your Mouth Croutons


Sadly I love carbs. Way too much. I also love croutons, which are good for the tastebuds, but bad for the waistline. Oh well :) Here is my recipe for croutons, on which are amazing on salads, soups, gumbos, or just as a snack. They are so easy too, and very affordable to make. I keep a couple bags of cheap hot dog buns in my freezer for whenever I need these!


Succulent Croutons


4 hot dog buns

6 tablespoons butter or margarine

2 tablespoons olive oil

1/2 teaspoon seasoning salt

1 teaspoon garlic salt

1/2 teaspoon pepper

1 tablespoon hot sauce (tabasco, cholula, or whatever you have)


  • In a large microwavable bowl, comebine butter and dry spices. Microwave 30-45 seconds or until melted.

  • Stir together, then add olive oil and hot sauce. Stir again until everything is well blended.

  • Cut up hot dog buns (I cut mine up straight from the freezer) into crouton size squares and put into the bowl.

  • Stir until squares are all coated with butter/spice mix.

  • Line large cookie sheet with foil and bake for 8 minutes at 450 degrees. Flip/stir, and bake for another 4-5 minutes but watch very closely as they brown super quick!

  • Take out and give one final stir and let cool. Store in a air tight space like a large ziplock or tupperware once they are cool.


Lime, Cilantro, and Garlic Roasted Chicken


So I was so happy with my Blasted Roasted Chicken from last week I decided to do it again this weekend! This time I used the same method, just changed up the spices. I used a whole chicken this time instead of 2 halves and it turned out so moist and delicious. I seriously hate skin, but with this method and these flavors it's not not to eat a bit of it!


Lime Cilantro, and Garlic Roasted Chicken


Basically you want to use the method in the post below for Whole Blasted Chicken. Instead of the spices there, I do the following:


  • Wash/dry the chicken. (Remove innards) Rub all over with a bit of olive oil.

  • Squeeze lime juice all over chicken. Place empty lime remains inside the chicken.

  • Smash 3 garlic cloves, and put inside the chicken.

  • Cut up one cup fresh cilantro and stuff inside the chicken.

  • Cut up 2 tablespoons fresh cilantro and sprinkle onthe top of the chicken.

  • Sprinkle chicken with fresh cracked pepper and coarse salt.

Roast at 450 for 20 minutes and then 400 for an hour! Do not baste! Once chicken is out of the oven, let sit for 15 minutes before carving. Delicioso!


Sunday, October 5, 2008

Whole Blasted Roast Chicken


Well you can probably tell by now, but we love our chicken! Often times I find whole chickens at a super duper low price, or, in this case, split whole chickens for a cheaper price. This is a great way to prepare a chicken, and it's even better than the $6 rotisserie chickens you get at the grocery store.

Once the chicken is finished, you can just pick the chicken apart and do as you wish.
  • Eat it alone, straight off the bone!
  • Chicken sandwhiches - Mayo and onion slices are all you need!
  • Chicken Noodle Soup
  • Chicken Salad
  • Chicken tacos, burritos, enchiladas

Basically any recipe you have that calls for pre cooked chicken, here you go! Tonight I had the pleasure of making this chicken for 2 reasons. One is going to be stored in the fridge and used for later in the week. I will also be using one tonight in a new recipe from my friend Kerri. I'm going to make her Paella! Here is a link if you want to check it out. Sounds delish!!

Chicken and Chorizo Paella http://myyummyeats.blogspot.com/2008/10/chicken-and-chorizo-paella.html

Ok so now you're wondering how I make this whole blasted chicken? The skin is crispy, the chicken is moist and full of flavor. Here is the recipe!

Whole Blasted Roast Chicken

1 whole chicken, or 2 split chickens (equal to one chicken!) with skin on, bone in.

2 tablespoons melted butter

2 tablespoons olive oil

2 tablespoons fresh lemon juice

1 tablespoon seasoning salt

1/2 tablespoon rosemary

1/2 tablespoon garlic powder

1 teaspoon pepper

1/8 teaspoon ground cayenne pepper (adjust to taste)

1 small onion, quartered

(This is just a very basic seasoning mix. Create your own, mix and match. Any thing will work great. This is more about the method of cooking the chicken.)

Directions: Preheat oven to 450. Now that's blasting heat!

Remove innards from the cavity of your chicken. Wash and pat dry your chicken. Place chicken in a roasting pan or glass baking dish. Mix liquids together and rub all into chicken. I use a cooking brush but your hands will work too.

Mix together in a small bowl your seasoning mix. Rub dry seasonings all into chicken. Make sure to lift up the skin and get it under the skin, but don't take the skin off! This will result in dry chicken.

Stuff the cavity with the onion quarters. If you are using split chicken like I did, put half the onion under each piece. Do not cover in foil.

Roast for 20 minutes at 450. Then, roast for 1 hour at 400 degrees. Take out of the oven and cover with foil for 15 minutes. Cutting into the chicken before the 15 minutes is up will result in all the wonderful juices running out of the chicken instead of redistributing back into the meat.

Once your 15 min is up (perfect time to wash dishes!) slice the chicken, dice it, shred it, or do whatever you need to do. If you are saving some for the next day, or later, let chicken cool completely before storing it in the fridge. Enjoy!

Wednesday, October 1, 2008

Carmelized Chicken Thighs


I'm not always a fan of the dark meat (well, when it comes to food - Heehee) but this chicken thigh recipe is a WINNER!!


I make it up in the morning, or even the night before. I toss the chicken thighs in a big ziplock bag along with the marinade and the onion rings, and then when I get home (or even DH can do this simple task!) I pop it in the oven. Make up a pot of rice, boil a veggie, and dinner is ready. Make sure to wash your hands before you eat because you will be licking your fingers :) Let marinate anywhere from 4-24 hours. The longer, the better. This marinade really tenderizes the chicken. Yummers.


Carmelized Chicken Thighs


6 -10 skinless, boneless chicken thighs (6 feeds about 3 people)


1/2 small onion, sliced into rings, and separated

2 tablespoons olive oil

3 garlic cloves, minced

1/4 cup ketchup

1/4 cup yellow mustard

1/3 cup cider vinegar

1/3 cup brown sugar

2 tablespoons worcestershire

1/2 cup water

1 tablespoon chili powder

1 pinch cayenne pepper

salt/pepper to taste


Put chicken and onion rings into a large ziplock bag.

Mix remaining ingredients in a bowl, this is your marinade.

Dump marinade into bag with chicken and onions.

Marinade 4-24 hours. Shake it once or twice to mix it all in good!


When you are ready to prepare your chicken, Preheat oven to 375. Dump everything out of the bag, including all the marinade. Roast for 1 hour, uncovered. Personally, the carmelized onion rings are just as delicious as the chicken! Serve over white rice with a vegetable on the side.

Tuesday, September 30, 2008

Bourbon Chicken - No, you don't use real bourbon!


I can't entirely take credit for this lovely recipe. I found the recipe online and made a few changes to suit my family's tastes. It's versatile because you can use either breast meat or thigh meat. Thigh meat is what they would use in a chinese takeout place, it's fattier, and juicier. If you use breast meat, which still tastes great, you just have to cook it for less time so it doesn't dry out.

To our family, this tastes like authentic chinese takeout. It's truly delicious! I make up a pot of white rice to serve with it. When the chicken is done, you will end up with a delicious glaze that you can drizzle over your chicken and rice. I serve a vegetable on the side, not mixed in with the chicken. Broccoli usually goes well.


Bourbon Chicken


3 boneless chicken breasts, or 6 bonless chicken thighs

2 tablespoons olive oil

4 garlic cloves, crushed and minced

1/2 teaspoon ginger

1 teaspoon red pepper flakes

1/3 cup apple or pineapple juice (either works just fine)

1/3 cup brown sugar

3 tablespoons ketchup

1 tablespoons cider vinegar

1/2 cup water

1/3 cup soy sauce

1 tablespoon cornstarch + 2 tablespoons water


Cut chicken in bite size pieces

Heat oil in large skillet

Once oil is hot, cook chicken just until lightly browned. Remove chicken, set aside.

Using the same skillet, add remaining ingredients (EXCEPT for cornstarch + 2 tbl water)

Stir and heat until sugar is Dissolved

Now, at this point if you are using thigh meat, put chicken back in and bring to a hard boil. Reduce heat, and simmer 20 minutes.

If you are using breast meat, bring to a hard boil, reduce heat, simmer for 10 minutes, THEN put chicken back in for the last 10 minutes of simmering. If you simmer breast meat for the whole 20 minutes, it will be on the dry side.


When I start the simmering process, that's when I start the white rice, since it usually takes about 20 minutes.


After the 20 minutes of simmering is up, in a separate small bowl, mix 1 tablespoon cornstarch with 2 tablespoons water and mix until dissolved. Add mixture to skillet with chicken and bring to a boil, stirring constantly. Let boil for 1-2 minutes, stirring constantly. Sauce should be considerably thicker. Turn off heat, and serve chicken and sauce over white rice.


You can't tell me this isn't super tasty!! Don't forget to serve with a hot vegetable on the side! Broccoli, peas, or green beans go great!

Monday, September 29, 2008

Italian Sausage Ba-Sketti anyone?


I always thought it was so cute, my little sister called it Ba-Sketti when she was little. In our house there were 2 kinds of spaghetti. My Mom made hers usually with a jar of spaghetti sauce, and ground beef. My dad made his from a box and ketchup. I hated Dad's spaghetti! I prefer my spaghetti full of flavor, a little spicy, and thick sauce. I can't stand runny sauce and if it's bland It's not even worth all the carbs. Here's my recipe, tried and true! The great thing about spaghetti, is it's hard to mess up. If you don't have a few of the spices, it's ok, just add more of the ones you do have. If you have some other italian-ish spices you want to add, toss em in! Add fresh or canned mushrooms if you like as well! I also use all dried herbs, it's much quicker!


Italian Sausage Spaghetti


1lb italian sausage, crumbled


1 small onion, diced (If i'm out of onion, I use a whole bell pepper, any color. works great!)


4 garlic cloves, minced


1 tablespoon dried basil

1 tablespoon dried oregano

1 teaspoon marjoram

1 teaspoon herbs de provence

1 teaspoon thyme

1 teaspoon garlic salt

1 teaspoon onion powder

1/2 teaspoon sage

1/2 teaspoon pepper

1/2 teaspoon red pepper flakes (adjust to taste)


14.5 oz can Diced tomatoes (I buy the kind with basil and garlic already in there, but plain works just as good)


6 oz can Tomato Paste


16 oz can Tomato Sauce (Use half this amount if you like a really thick sauce)


1/2 lb angel hair pasta


Remove outer casing from Sausage and crumble by hand into a hot pot. Make sure the pot is big enough for all the spaghetti. This is a one pot meal!


While sausage is cooking (make sure to stir/cumble often) dice up the onion, and the garlic. Add it to the pot, even if the sausage isn't fully browned yet. Stir often.


Once sausage is browned, and onions/garlic start to get soft, add all of the spices. Stir. Your house should be smelling REALLY good right about now.


After the spices are mixed in, open up your cans, and dump em all in. Bring to a boil. But be careful, this will happen fast, and will make a mess if you let boil too long. As soon as it comes to a boil, turn it down on low, and let it simmer one hour.


When sauce is almost done (taste, make sure it's a great flavor) boil your noodles. Drain noodles and mix with sauce. If you prefer to serve your noodles and sauce seperately, that works too!


Serve with crusty garlic bread and a small green salad. You will be one happy camper!


Sunday, September 28, 2008

Completely Ugly, Totally Tasty


Boredom got the best of me on a lazy Sunday afternoon! It's too early to cook dinner, and since the leftovers of the Chargers cake got left at Melvin's Mom's house, I decided to make him his own personal cake here!


Want the ever complicated instructions?


Get a box of strawberry cake mix, and follow the directions.


Ok now that we have that part down, I did make my own frosting! It turned out great.


Cream Cheese Frosting:


8oz. package cream cheese (at room temp!!)


1/4 cup butter (at room temp!!)


3 cups powdered sugar (Honestly, I didn't measure this part, I dumped the rest of what was left in the bag, into the bowl, and I'm guessing 3 cups. You can do anywhere from 2-4 cups, it just changes the consistancy a bit)


1-3 tablespoons milk (again, didn't measure, but you want to add this last, just to get to your desired consistancy!)


Dump everything into a bowl besides the milk. Use a speed mixer, and mix it until it's creamy. Add a tablespoon or so of milk at a time, until you get it how you want it. You may not even have to use any at all, it just depends on how you like your frosting!


You can also flavor your frosting. Add some vanilla extract, lemon extract, or almond extract in for extra flavor.


After frosting my cake, I had some leftover frosting in the bowl. I added about 10 drops of green food coloring and mixed it well. I scooped it into the corner of a little sandwhich ziplock bag, and made sure it was all in the corner. I cut off the very little tip of the corner of the bag, and used that as my "cake decorator" it was all very artistic, let me tell you!!


It's not the prettiest thing I've ever made but it was more for fun, and I don't think Melvin cares once he gets his first bite! Hee hee.... enjoy your Sundays!!
By the way, the cake reads "Melvin turns 36" I know, cursive is hard with a ziplock bag and frosting!!

Pasta Salad, Surprise Party!!

Here is the recipe for my Cold Italian Pasta Salad. Honestly, be careful because if you are not already attached, you might make someone fall in love with you by serving this pasta. Don't say I didn't warn you!!

Cold Italian Pasta Salad

(I use two bags of pasta for a crowd, and just one bag if I'm making it for us to eat)
1-2 bags Rainbow Rotini Pasta (they are the spiral pasta that are 3 red,green,and white)

1 large cucumber, diced

3-5 slices red onion, finely diced. If you don't like a lot of onions, cut it back, or leave them out. Mel's aunt hates onions but loves the pasta, so I always put the salad together, take out a portion for her, and then add the onions last.

1 small package pepperoni slices, cut in half

1 small package salami slices, cut in quarters

diced olives (totally optional)
small package cherry tomatoes, halved (totally optional)

1 regular sized bottle Italian Dressing. YOU MUST USE KRAFT ZESTY ITALIAN SALAD DRESSING! It will not be at all amazing without it. No substitutions!! PICTURE BELOW!

Ok so you've got all your ingredients!!

Boil water in a large pot. Add a teaspoon of salt, and boil pasta as directed. Do not overcook, pasta will not be good with mushy pasta! I start tasting one piece of pasta every minute to make sure it's at it's desired consistancy. When pasta is al dente, drain and immediately run cold water over it (in a colander) until pasta is no longer warm. Drain, and put in a large serving bowl.

Cut up the rest of the items, and add to the bowl. Add dressing, and toss to coat. You can eat this pasta right away, but it's awesome after a few hours or even the next day because the dressing soaks into the pasta and all the flavors begin to marry. Make sure to stir before you serve.


Melvin's family has get togethers ALL THE TIME! He has an extremely large extended family all living in San Diego so there is always something going on at somebody's house. One of the first times I came along with Melvin to a family shindig was a BBQ at his cousin's house. My Mom used to make this delicious cold pasta salad that my sister and I would always go crazy over. I decided to bring this to the BBQ and now I am asked to make it literally every single time we get invited to a family event.

Melvin's 36th birthday is today so we surprised him yesterday with a big party at his Mom's house! I tricked him over there by saying we had to drop by his Mom's house to pick up a bday gift on our way out for the night. We got there and all the lights were off. Melvin opened the front door and everyone screamed SURPRISE! and he was totally shocked!! We are big San Diego Chargers fans, so isn't this cake we got for the party awesome??


Thursday, September 25, 2008

Yo Quiero Verde Enchiladas


These enchiladas are serious the business. My Mom started making these a few years ago and the fever caught on immediately. Melvin just goes crazy when I make these. This is yet another recipe where you can make changes. Melvin loves onions, and they onions don't get very soft in this dish, they stay crunchy, so if you don't like em, don't use em! Add black olives to the top if you like.
Here ya go...
Green Enchiladas
2 cooked, shredded chicken breasts ( I wrap in foil, season with garlic salt and chili powder, drizzle olive oil, and bake for 45 min at 350) Let cool, then shred with 2 forks
8oz package cream cheese, softened at room temp
1 4oz. can diced green chilis (these are not spicy)
1 large can green enchilada sauce
3 slices white onion, diced
2 cups shredded cheese (mexican blend, or queso, or colby jack works fine)
About 12 tortillas (depending on size you use)
3 green onions, chopped
Once you have cooked and shredded the chicken, put it in a medium bowl. Add the can of diced green chilis, soft cream cheese, diced onions, and about 1/4 cup of the green sauce. Add in a small handful of shredded cheese if you like. I use a fork and mash it all together.
A 9x11 glass baking dish works well. Pour a couple tablepsoons green sauce on the bottom of the pan. Take chicken/cheese mixture and roll it up evenly in as many tortillas you can fit into the baking dish. Pack them in as tight as possible. Pour remaining sauce over rolled/filled tortillas. Sprinkle remaining cheese over it all. Sprinkle green onions over the top.
COVER WITH FOIL!! If you are making this early in the day (or the night before) for later, you can just store it in the fridge, and then pop it in the oven when you are ready to eat. This dish needs to be cooked (with foil) for 45 minutes at 350 degrees. Cheese should be bubbly. Let sit 10 minutes before serving.
I serve mine with tortilla chips, or spanish rice. Usually everyone is mad because there are no leftovers and the pan is licked clean. Boo whoo. I believe these enchiladas make Melvin fall in love with me just a little more each time I make them! :)

Wednesday, September 24, 2008

A request - Chicken Pot Pie!!

I don't care whether it's summer spring winter or fall...there is always a time for chicken pot pie! This recipe is seriously so easy and it tastes amazing. I'm a big fan of pepper, so this calls for a lot and it REALLY adds a lot but if you don't like pepper as much, feel free to cut back. I think that is the most important faucet of cooking actually. If you are cooking from a recipe, make it your own! Add more of something you love, and vice versa. Substitue where you see fit.

Chicken Pot Pie

1 (15 oz) package ready made pie dough (comes with 2 crusts) and you can find this in a box next to all the refridgerated rolls and premade cookie dough

1 (10 oz ) package frozen mixed veggies (choose your favorite veggies, but I like corn, peas, carrots, and lima beans)

1 celery stalk, cut in half and diced

1-2 cooked chicken breasts (I use 2 b/c we like a meaty pot pie! I season my chicken with garlic salt and pepper, drizzle with olive oil, and wrap in foil. Put in oven at 375 for about 45 min. Let cool, and dice in bite size chunks)

1 10 oz can cream of potato soup
1 10 oz can cream of chicken soup
1/3 cup milk
1 teaspoon lawry seasoning salt (or whatever you have!)
1-2 teaspoons black pepper

Line 9 or 10 inch glass pie plate with first crust. Set aside.

In medium bowl, combine remaining ingredients (dump and stir!)

Pour filling into pie plate

Top with the second crust. Make a few slits in the top crust to vent and bake at 375 for about an hour or until golden brown. Watch closely. If pie edges start to brown too fast, cover with foil. Let sit 5-10 minutes before serving.

***I always put my pie plate on a foil covered cookie sheet in case some of the filling starts dripping out. Don't want that stuff burning in your oven for weeks to come!!


Seriously this pie is great. My man is a big eater and even one piece fills him up for the rest of the night. Enjoy!

Tuesday, September 23, 2008

BBQ Coca-Cola Shredded Chicken

This is one of the boys' favorites. It's so easy and it's perfect for those days where you don't have a bunch of time.

If you own a crockpot, you've got to try this!!

This feeds about 4 people.

3 skinless boneless chicken breasts
3/4th can of coke
2 lemon slices
1 bottle BBQ sauce (your favorite flavor)
1-2 teaspoon red pepper flakes (if you like things a little spicy)

Dump everything besides the chicken into the crockpot. Stir until mixed together. Leave chicken breasts whole, and submerge into the coke/bbq juice. Cover with tight fitting crockpot lid, and cook on low for 4 hours. I usually stir once or twice and/or turn chicken over during these 4 hours. After 4 hours, take chicken out and shred with 2 forks. Put chicken back and put crockpot on "warm" setting. Let chicken sit for 30-60 minutes. Serve on hamburger buns.

I usually serve mine with tater tots, and corn!

This chicken is also really good leftover the next day. If I know I have a busy week, I will double the recipe and have the boys have it for dinner the next night. They never complain!!

When I grow up

I love to cook! There is something inside of me that get's great pleasure from seeing something amazing and delicious coming out of the oven.... and I made it!!

I am a devoted wife and step mother and I love taking care of my family. I believe that is a great way to show my love and devotion, making mouth watering dishes for everyone to enjoy. I haven't always been a good cook! I started baking way before I started cooking and I was always decent at that. But practice does make perfect and since I'm not a huge fan of fast food, or spending a million dollars eating out, I try to get creative in the kitchen and turn a few on hand ingredients into something my boys will be asking me to make again and again!!

I wanted to share my cooking adventures with anyone who also shares my passion, or maybe someone who would like to turn her kitchen into a place where everyone knows there is something tasty cooking up!

My husbands friends don't come over to see him anymore it seems. Rather he is an afterthought after they look in the fridge or ask "What did Marcie make today?" I absolutely love sharing my desserts with friends and family. I love cooking for crowds and the best compliment I can recieve is; "Can I have seconds?"